Accounts & Channels
How to access Lynk Tools and select your channel
Logging In
To use Lynk Tools, you need an account created by your administrator. When you open the application, you will be prompted to sign in with your email and password.
If you don't have an account, contact your administrator to create one for you.
First Login
When your account is first created, you will receive a temporary password. On your first login, you will be asked to change your password to a new one of your choice.
Forgot Password
If you forget your password, click "Forgot password?" on the login page and enter your email. Your administrator will be notified and can reset your password.
Selecting a Channel
After logging in, you will see a channel selector in the left sidebar under Settings. This dropdown lists all channels that your administrator has configured for your account.
- Select the channel you want to work with from the dropdown
- All tools (Preschedule Manager, Schedule Manager, Schedule Creator, etc.) will operate on the selected channel
- You can switch channels at any time by selecting a different one from the dropdown
Account Security
- Your API credentials (Channel ID, User ID, API Secret) are managed by your administrator and stored securely on the server
- You do not need to manually enter or manage API credentials
- Your session token expires after 30 days, after which you will need to log in again
- Click "Logout" in the top-right corner to end your session
Preschedule Manager
Complete guide to using the Preschedule Manager
About This Tool
This is a preschedule management tool that uses the Uplynk APIs to enable asynchronous schedule creation with media availability. You can create and adjust a schedule while media files (assets) are being uploaded to Uplynk CMS by other teams.
The tool automatically uses the external_id field to locate media files in Uplynk CMS and associate them with schedule entries. This allows parallel workflows where:
- Schedule managers can import and prepare the preschedule
- Media teams can upload assets to Uplynk independently
- The tool automatically matches assets when they become available
- Ready entries are sent to Uplynk automatically (if enabled)
M28366.mp4, M28366_promo.mov, etc. The tool searches for assets where the external_id matches.
Table of Contents
Import CSV File
The first step is to import your preschedule data from a CSV file. You can drag and drop the file or click browse to select it.
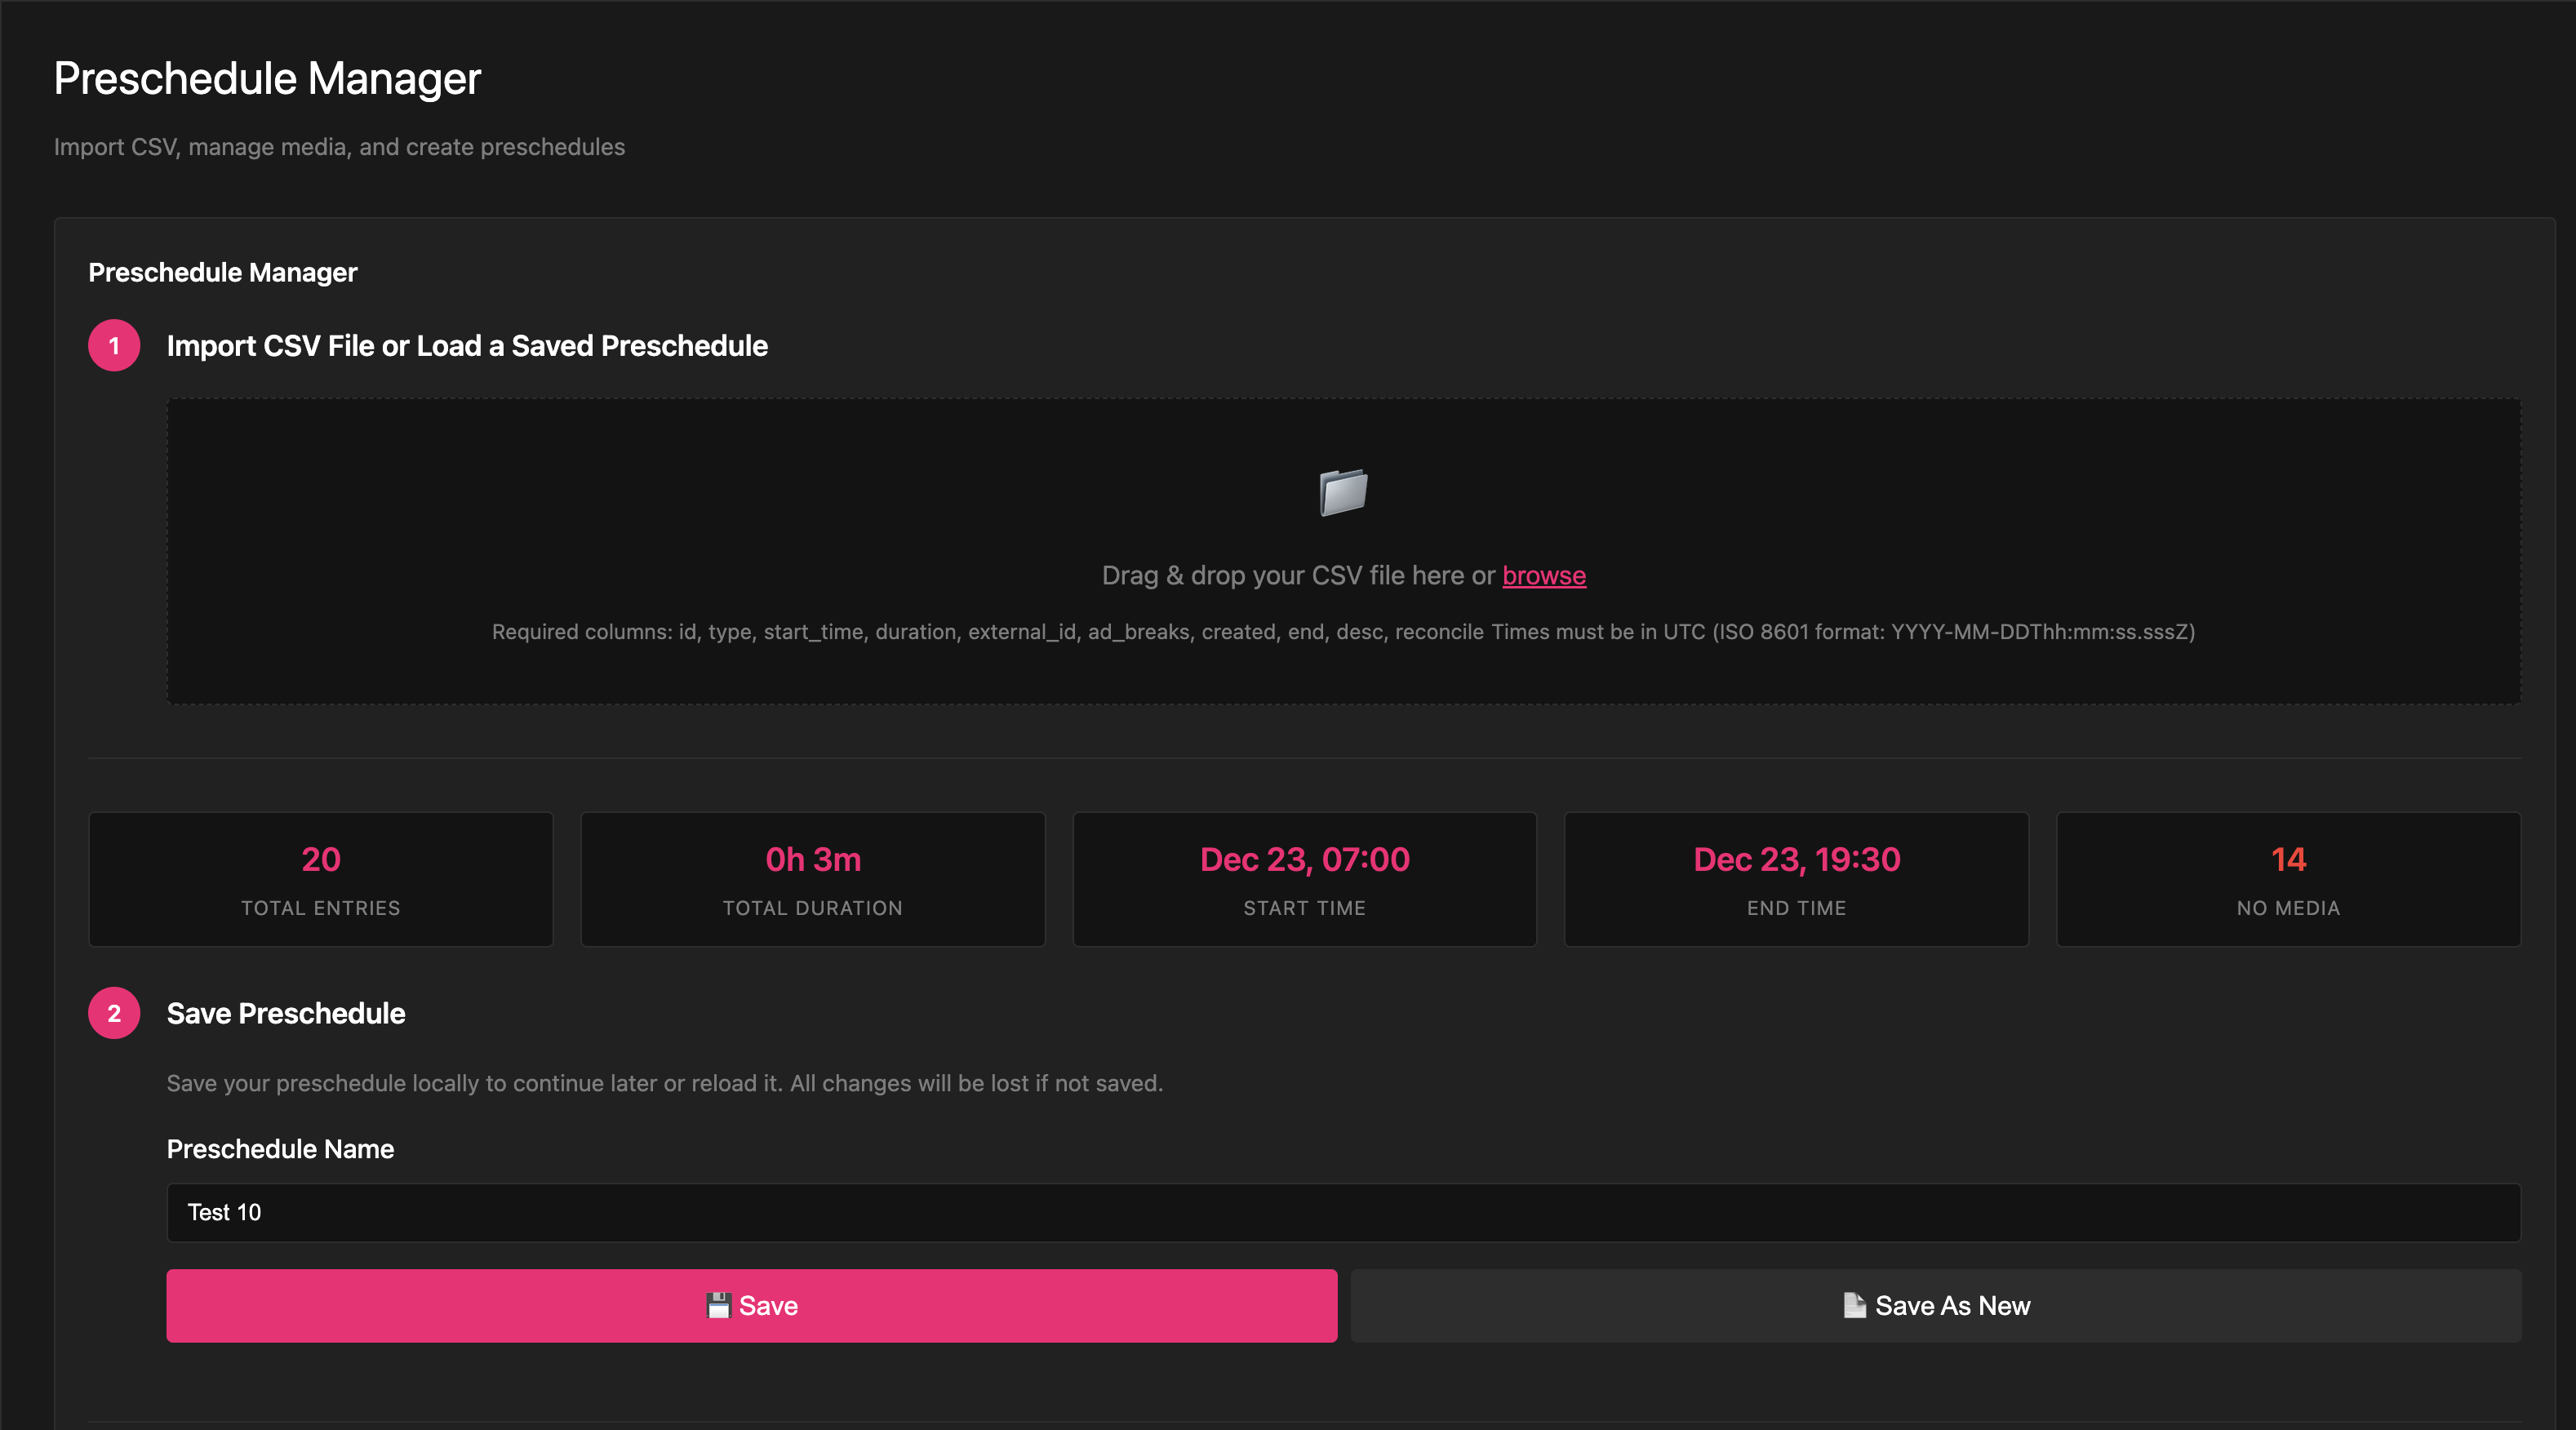
CSV Format Requirements:
- Required columns: id, type, start_time, duration, external_id, ad_breaks, created, end, desc, reconcile
- Times must be in UTC using ISO 8601 format:
YYYY-MM-DDThh:mm:ss.sssZ - The tool will automatically convert UTC times to your configured local timezone for display
After importing, you'll see statistics about your preschedule: total entries, duration, start/end times, and how many items are missing media.
Save Preschedule
Enter a name for your preschedule and click:
- 💾 Save: Updates the current preschedule (if previously loaded)
- 📄 Save As New: Creates a new saved preschedule
When saving for the first time, you'll be asked to create a password. This password encrypts your API credentials stored with the preschedule.
Check Preschedule and Assets at Uplynk
This section displays your preschedule in a weekly calendar view and allows you to manage media files.
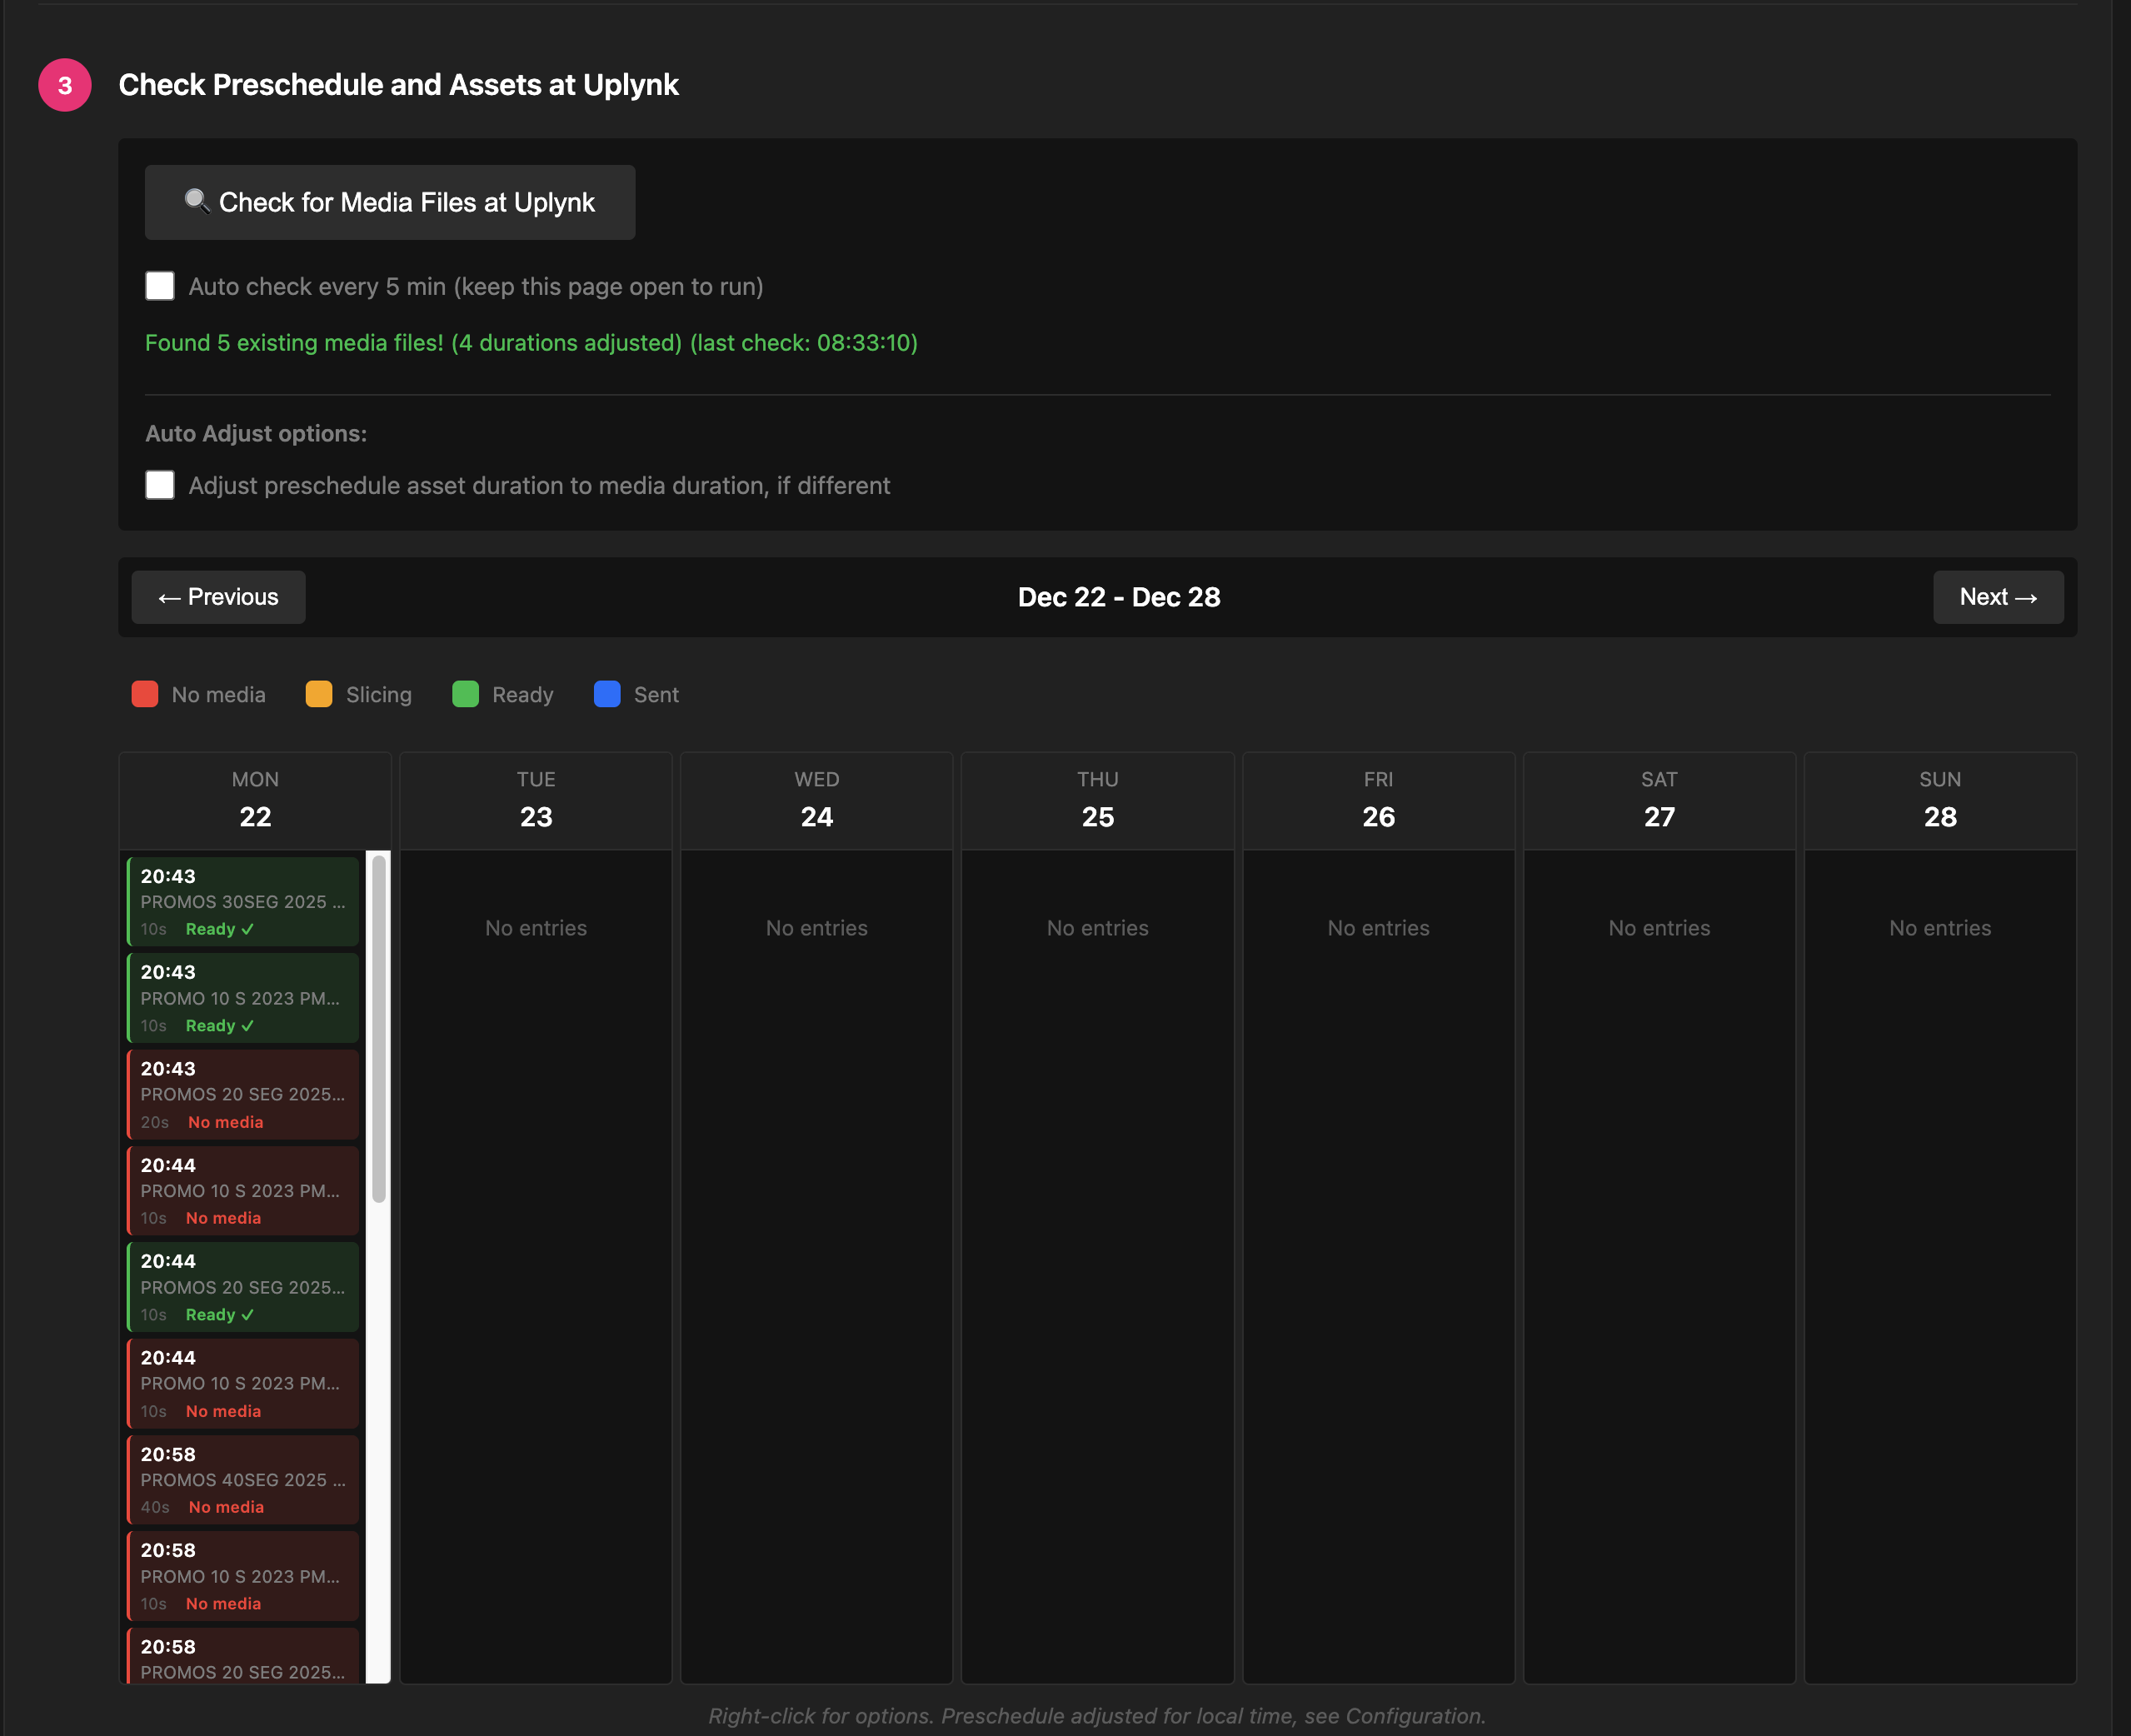
Status Colors:
Buttons and Options:
- 🔍 Check for Media Files at Uplynk: Searches Uplynk for existing media files that match your assets (by external_id). Found media will automatically update the status to "Ready".
- Auto check every 5 min: When enabled, automatically checks for media files every 5 minutes. Keep the page open for this to work.
- ← Previous / Next →: Navigate between days in the calendar view.
Auto Adjust Options:
Below the check button, you'll find automatic adjustment options:
- Adjust preschedule asset duration to media duration, if different: When enabled, the tool compares the duration of each asset in your preschedule with the actual duration of the media file in Uplynk. If they differ, the preschedule entry is automatically updated to match the media duration. This prevents duration mismatch errors when sending to Uplynk.
Right-Click Context Menu:
Right-click on any entry to access additional options:
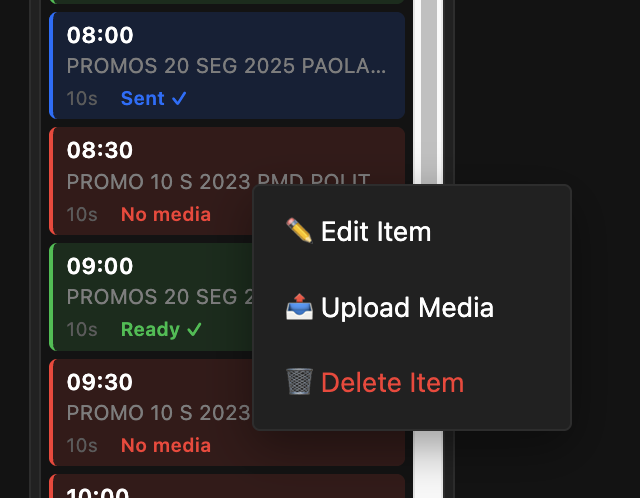
- ✏️ Edit Item: Opens the edit dialog to modify entry details
- 📤 Upload Media: Upload a media file for this asset
- 🗑️ Delete Item: Remove the entry from the preschedule
Edit Entry Dialog:
The edit dialog allows you to modify all entry properties:
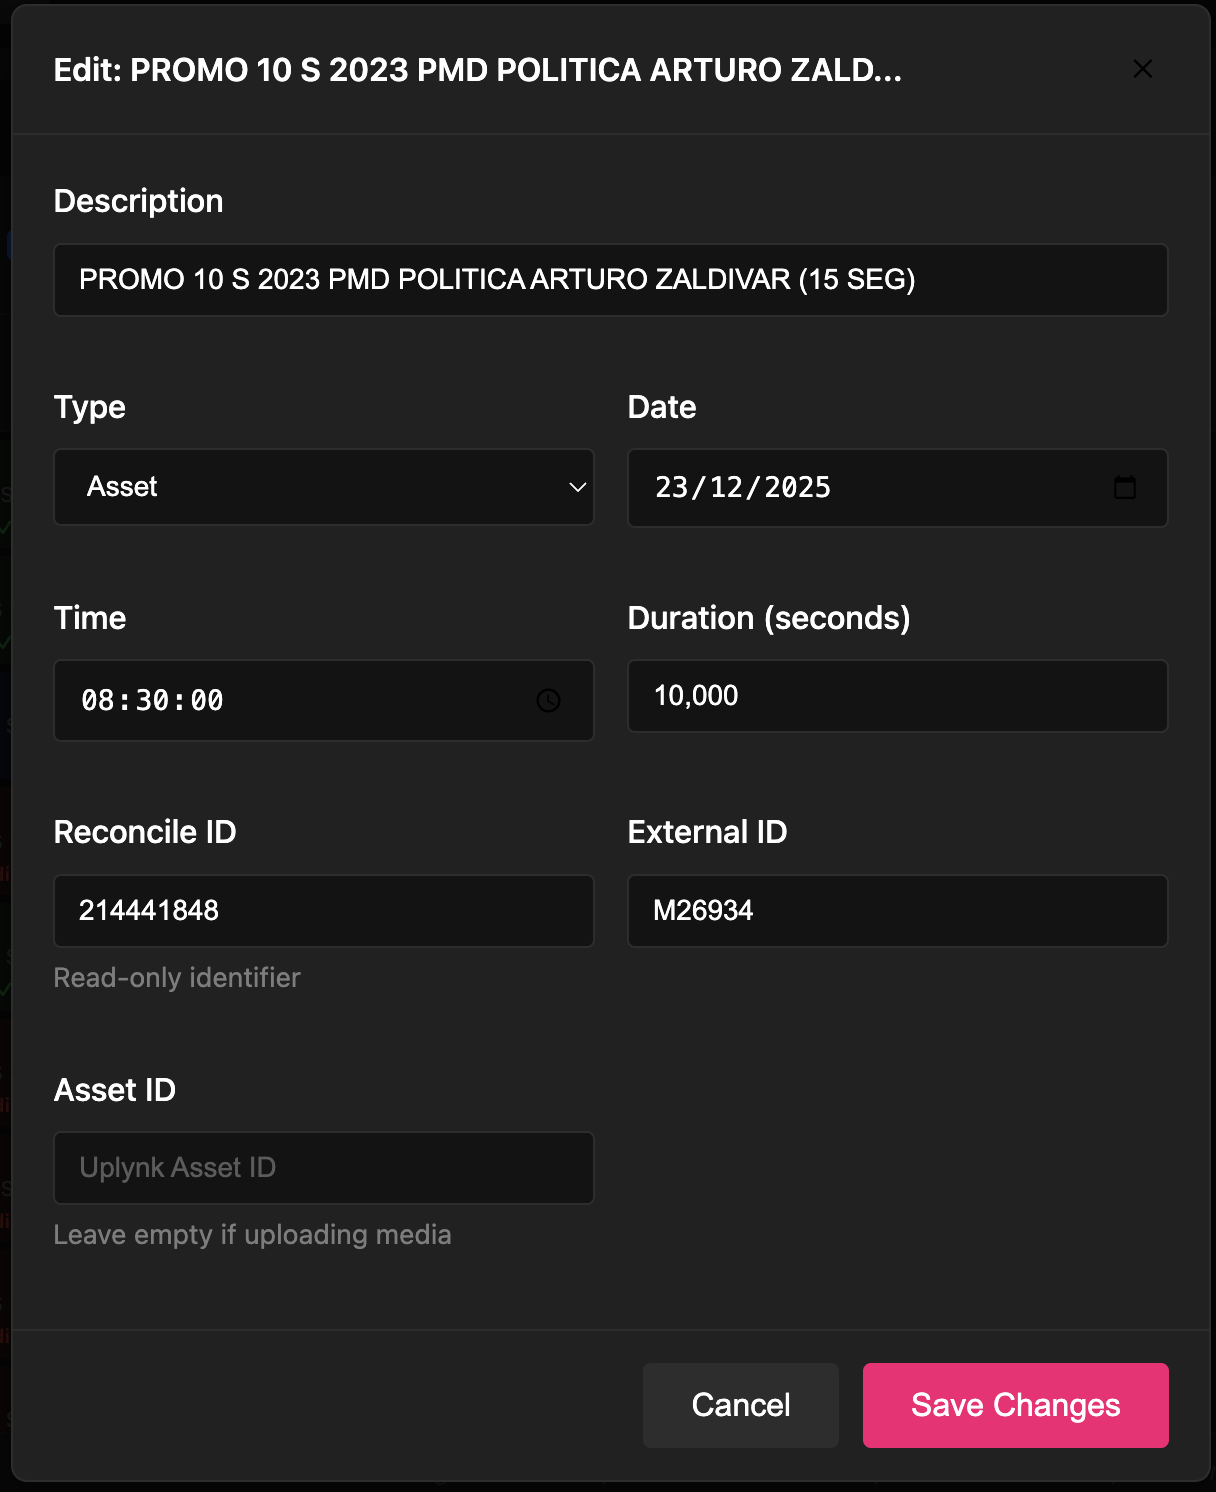
- Description: The display name of the entry
- Type: Asset, Ad Break, or Slicer
- Date and Time: When the entry should play (in local timezone)
- Duration: Length in seconds
- External ID: Identifier used to match with Uplynk assets
- Asset ID: The Uplynk asset ID (leave empty if uploading media)
Upload Media Dialog:
You can upload media files in two ways:
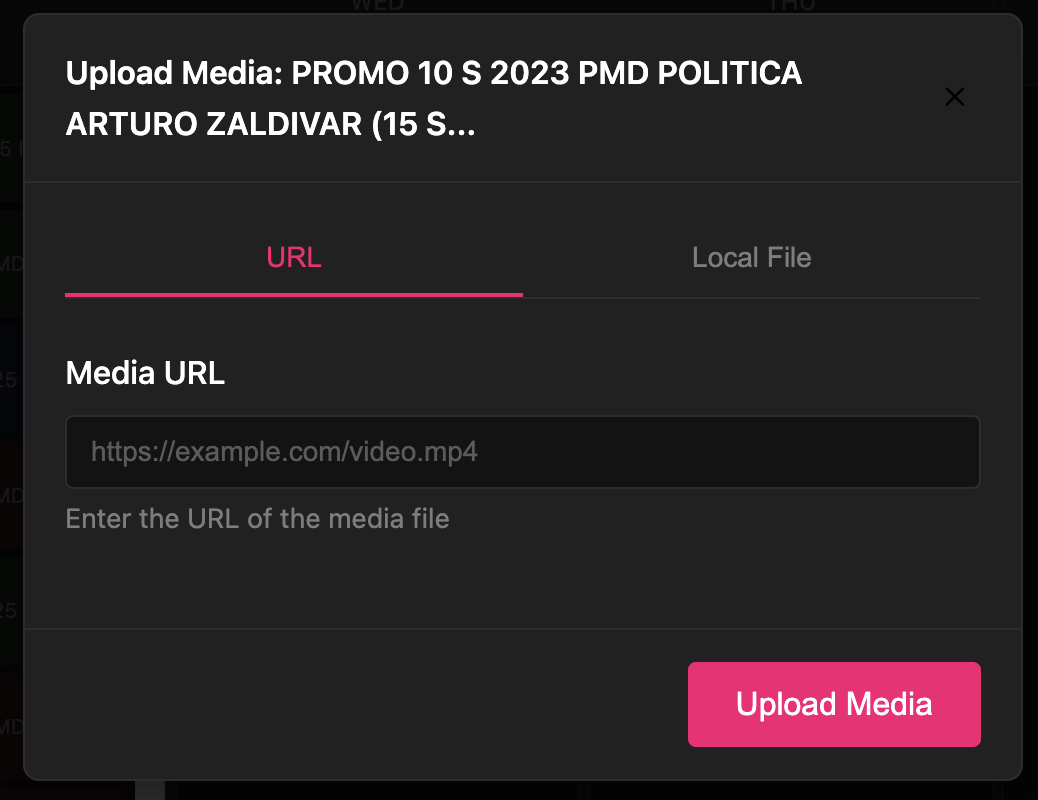
- URL: Enter a direct URL to a video file (must be publicly accessible)
- Local File: Upload a video file from your computer (MP4, MOV, AVI, MKV, MXF)
After uploading, the media will be processed by Uplynk Cloud Slicer. The status will change to "Slicing" and then to "Ready" when complete.
Create Schedule in Uplynk
Once your assets are ready, you can send them to the Uplynk schedule.
Conflict Resolution:
Before sending, choose how to handle entries that overlap with existing schedule items in Uplynk:
- Keep existing (skip conflicts): If an entry already exists at the same time, the new entry is skipped. This is the safest option to avoid overwriting existing schedule items.
- Replace existing entries: Overwrites any existing entries that overlap with the new entry. Use this when you want to update the schedule with new content.
- Trim start of conflicting entries: Adjusts the start time of existing entries to avoid overlap.
- Trim end of conflicting entries: Adjusts the end time of existing entries to avoid overlap.
Buttons:
- 📤 Send Ready: Sends all entries with "Ready" status to Uplynk. Entries are sent in parallel (up to 20 at a time) for faster processing.
- Auto send when ready: When enabled, automatically sends entries to Uplynk as soon as they become ready (after media processing completes).
What happens when sending:
- The tool converts local times back to UTC before sending to Uplynk API
- Entries that end in the past are automatically skipped
- Successfully sent entries change status to "Sent" (blue)
- Failed entries show an error message and remain "Ready" so you can retry
- The preschedule is automatically saved after sending
Results:
After sending, you'll see a summary of successful and failed entries. The execution log shows details for each entry, including any error messages.
Click Export Log to download the execution log as a text file for troubleshooting.
Schedule Manager
View and edit your Uplynk channel schedule directly
About This Tool
The Schedule Manager allows you to view, edit, and manage your Uplynk channel schedule directly. Unlike the Preschedule Manager which works with CSV imports, this tool connects directly to your Uplynk channel and shows the current schedule.
Key features:
- View schedule: See all scheduled entries in a weekly grid view
- Add entries: Manually add new schedule entries
- Edit entries: Right-click any entry to edit its details
- Delete entries: Remove entries you no longer need
- Copy/Paste days: Copy an entire day's schedule and paste it to another day
- Delta save: Only modified, new, or deleted entries are sent to Uplynk (faster saves)
Getting Started
Prerequisites:
Before using the Schedule Manager, make sure you have selected a channel from the dropdown in the left sidebar. Your administrator manages the API credentials for each channel. See Accounts & Channels for details.
Loading the Schedule:
- Click "Schedule Manager" in the left sidebar
- Select the Start Date and End Date for the schedule range you want to view
- Click "📥 Download Schedule"
- The schedule will be loaded and displayed in a weekly grid view
Navigating the Schedule
The schedule is displayed in a weekly grid view with days as columns:
- ← Previous / Next →: Navigate day by day through the schedule
- Scroll: Each day column can be scrolled independently
- 🔗 Sync Scroll: Enable this option to scroll all columns together
Entry Colors:
Each entry is assigned a unique color based on its Asset ID or Content ID. This color-coding makes it easy to visually identify and track the same content across different days in the grid view.
- Entries with the same ID will have the same color
- Colors are automatically generated using a hash of the ID
- This helps you quickly spot patterns and identify recurring content
Gap Indicators:
A dashed line between entries indicates a gap in the schedule (more than 5 seconds between entries).
Adding New Entries
- Click the "➕ Add Entry" button
- A new entry will be created with default values
- The edit modal will open automatically
- Fill in the required fields:
- Description: Name/title of the entry
- Type: Asset, Slicer, Ad, or Break
- Start Time: When the entry should start
- End Time: When the entry should end
- Asset ID: The Uplynk asset ID (content_id)
- Click "💾 Save" to save the entry locally
Editing Entries
To edit an existing entry:
- Right-click on any entry in the grid
- The edit modal will open with the entry's current values
- Make your changes
- Click "💾 Save" to save locally, or "🗑️ Delete" to remove the entry
Copy & Paste Days
You can copy an entire day's schedule and paste it to another day:
- Click "📋 Copy" on the day you want to copy
- Navigate to the target day
- Click "📥 Paste" on the target day
- All entries from the source day will be copied to the target day with adjusted dates
Saving Changes
When you're ready to upload your changes to Uplynk:
- Click the "💾 Save Schedule" button
- A progress bar will show the upload status
- Only modified, new, or deleted entries are sent (delta save)
- The schedule will automatically reload after saving
What gets saved:
- New entries: Entries you added with "+ Add Entry"
- Modified entries: Existing entries you edited
- Deleted entries: Entries you removed
Tips & Best Practices
- Start with a small range: Load 1-2 weeks at a time for better performance
- Use Copy/Paste for patterns: If you have a repeating daily schedule, copy one day and paste to others
- Check for gaps: Look for dashed lines that indicate gaps in your schedule
- Verify Asset IDs: Make sure the Asset ID is correct before saving new entries
- Save frequently: Don't wait too long to save your changes
- Refresh after saving: The schedule automatically reloads, but you can manually refresh if needed
Find & Replace
The "🔍 Find/Replace" button allows you to search for entries by description or content ID and replace them with new values. This is useful for bulk updates across your schedule.
How to use:
- Click "🔍 Find/Replace" button
- Choose to search the entire schedule or select a date range
- Optionally check "Exact match only" for precise matching
- Enter search criteria:
- Description: Search by entry description (optional)
- Content ID: Search by asset content ID (optional)
- Enter replacement values:
- New Description: Replace description (optional)
- New Content ID: Replace content ID (optional)
- If you selected a replacement asset and its duration is different, optionally enable "Auto-adjust schedule duration"
- Click "🔍 Find Matches"
- Review the confirmation showing how many matches were found
- Click OK to perform the replacement
Search Modes:
- Partial Match (default): Finds entries where the field contains the search term
- Example: "NBC" will match "NBC East", "NBC West", "NBC_backup"
- Exact Match: Finds entries where the field exactly equals the search term
- Example: "NBC East" will only match "NBC East" (not "NBC East 2")
Auto-adjust schedule duration
When the replacement asset has a different duration, enable "Auto-adjust schedule duration" before finding matches. This keeps the day continuous by applying the selected asset's real duration to each matched entry and shifting the following entries in the same day.
- Shorter replacement asset: Following entries move earlier to close the gap.
- Longer replacement asset: Following entries move later to make room.
- Small gaps: Tiny same-day gaps created by rounding are closed automatically.
- Asset safety: The tool validates asset duration before saving so an item is not shortened by itself and full assets are not cut.
Example Scenarios:
- Change asset ID: Find "TX_NBC_East" and replace with "TX_NBC_West"
- Update description: Find "Morning Show" and replace with "Morning News"
- Bulk update: Find all entries with "temp" in the ID and replace with production IDs
- Replace different durations: Select the new asset, enable auto-adjust, and let Lynktools shift later entries to keep the day continuous
📄 Export PDF
Click "📄 Export PDF" to generate a PDF document of the current schedule view. The PDF includes:
- The full weekly grid view as displayed on screen
- All visible entries with their colors and times
- One page per week row
PDF Filename:
The generated PDF is automatically named with the channel name and date range, e.g.: SkyOne_2026-03-13_to_2026-03-27.pdf
📋 Copy Schedule to Clipboard
Click "📋 Copy to Clipboard" to copy the entire schedule to your clipboard in a structured text format. This is useful for:
- Pasting into spreadsheets or documents
- Sharing schedule information via email or chat
- Creating backups of the current schedule state
⏩ Shift Entries
The "⏩ Shift Entries" feature lets you select one or more entries in the grid and move them forward or backward in time by a precise amount — without opening each entry individually. Changes are applied locally in memory and only sent to Uplynk when you click "💾 Save Schedule".
How to use:
- Click the "⏩ Shift Entries" button in the toolbar (next to "Add Entry")
- A yellow Shift Mode Active banner appears above the grid — all other edit interactions are disabled while in this mode
- Click entries in the grid to select them (they highlight with an amber border and full brightness). Click again to deselect
- Once at least one entry is selected, the Shift Controls bar appears with:
- A text input for the shift amount
- An "⏩ Apply Shift" button (also triggered by pressing Enter)
- A "Cancel" button to exit shift mode without applying changes
- Type the desired shift amount and click "⏩ Apply Shift"
- If the shift is valid, selected entries are moved in memory and shift mode exits automatically
- Click "💾 Save Schedule" to persist the changes to Uplynk
Shift Amount Format:
The input accepts human-readable duration strings. Use + or no prefix for forward, - for backward shifts:
| Input | Meaning | Seconds |
|---|---|---|
30s | +30 seconds | +30 |
1m | +1 minute | +60 |
1m30s | +1 min 30 sec | +90 |
1h | +1 hour | +3600 |
1h15m30s | +1 h 15 min 30 sec | +4530 |
-2m | −2 minutes (backward) | −120 |
-1h30m | −1 hour 30 minutes | −5400 |
Gap Validation:
Before applying, the tool checks that no selected entry will overlap with a non-selected entry after the move:
- Shifting forward (+): there must be free space (gap) after the last selected entry
- Shifting backward (−): there must be free space before the first selected entry
- If a conflict is detected, an error toast identifies which entry would be overlapped — no changes are applied
Visual Cues:
- Unselected entries are dimmed (35% opacity) so selected ones stand out
- Selected entries appear at full brightness with an amber border
- The banner counter shows how many entries are currently selected
Schedule Automation
Automate asset replacement and scheduled asset injection in your channel schedule
About This Tool
Schedule Automation has two job types for common schedule operations:
- Replacement jobs swap an existing scheduled placeholder with a newer asset
- Schedule Auto Injection jobs insert up to 5 assets in sequence at a planned schedule time
Use Replacement when the schedule already contains a placeholder. Use Injection when you want to add a scheduled sequence without selecting a placeholder first.
Choosing the Right Job Type
New Replacement Job
Use this when an asset already exists in the schedule and must be replaced by fresh content. Common examples:
- Replacing a dummy/placeholder item after a recording is ready
- Replacing a generic episode with the newest uploaded episode
- Using a primary and backup upload name, where the newest available asset wins
New Schedule Auto Injection Job
Use this when you want to insert assets at a specific date and time. Common examples:
- Injecting promos, announcements, or special content at a planned time
- Injecting a short sequence of assets back-to-back
- Running the same injection on selected weekdays
How Replacement Jobs Work
Each replacement job follows this decision flow when it executes:
→ Uses primary
→ Uses backup
→ Most recent wins
→ See step ④
When neither target is found
If neither the primary nor the backup asset is found, the job's behavior depends on the "Delete asset if targets fail" option:
The placeholder stays in the schedule unchanged. The job logs a failure. Use this when keeping the placeholder is acceptable.
The placeholder is removed from the schedule. The channel falls back to whatever is configured as the default (usually a live slicer stream). Use this when airing an outdated placeholder is worse than having no entry.
Replacement Job Configuration
Click "➕ New Replacement Job" to open the configuration modal.
Job Name
A friendly name to identify this job (e.g., "NBC Morning Replacement").
Asset to Replace
Click "📦 Select Asset" to pick the placeholder currently in the schedule. You can search and filter the channel's asset list.
Target Asset Name
The exact name to search for in Uplynk CMS. Case-sensitive. If multiple assets share the same name, the most recently created one is used.
Backup Target Asset Name
Optional fallback name. When both primary and backup exist, the system compares their creation dates and uses whichever is newer. This is useful when two different recording sources might produce the same content under different names.
NBC 06:00-10:00 (UTC -6) for the primary and NBC 06:00-10:00 BACKUP for the backup.
Options
- Delete asset if targets fail: Removes the placeholder from the schedule when no target is found (see "How It Works" above for details)
- Use only assets created in the last 24h: Ignores older assets. Enable for daily content, disable for evergreen/library content
- Enable this job: Toggle the job on/off without deleting it
Scheduling (When to Run)
- Every X minutes: Repeats at the specified interval (e.g., every 60 min). Each execution still replaces only the next matching occurrence after that run time
- Every day at specific time: Runs once per day at the configured time in your timezone
- Fixed day (one time only): Runs once at a specific date/time, then auto-disables
Email Notifications
Add email addresses (comma-separated) to receive execution reports. Choose notification triggers: success, failure, or both.
Schedule Auto Injection Jobs
Click "➕ New Schedule Auto Injection Job" when you want to add assets directly to the schedule at a planned time.
Assets to Inject
- Select up to 5 assets
- The selected order is the playback order in the schedule
- Only the asset names are saved in the job
- If more than one asset has the same name, the newest matching asset is used when the job runs
Injection Schedule
- Start Date: The first date when this injection is allowed to run
- Days of Week: Choose one or more weekdays for recurring injections
- Time to Run: When the job checks the schedule and prepares the injection
- Injection Time: The schedule time for the first injected asset
Schedule Conflicts
When you save an injection job, the tool checks whether the selected assets fit at the requested Injection Time.
- If the schedule is clear, the job can be saved normally
- If existing schedule items are in the way, you can go back and edit the job
- You can also choose to continue and allow the job to delete the conflicting schedule items during injection
Long Assets and Midnight
Plan injection jobs so the full injected sequence fits in the intended schedule day. If a long asset would continue into the next day, split the plan into separate jobs or choose a shorter asset sequence.
⏱️ Timing & Scheduling
Proper timing ensures the replacement happens after the new content is ready but before it needs to air.
Key Rules
- The job's "current day" is based on your timezone (00:00–23:59 local), not UTC
- Only the next matching entry after the job run time is replaced per execution
- Schedule the job at least 2 minutes after the recording/upload finishes
- Typical API call takes ~1 second — leave at least 30–60s buffer before air time
Example: Daily Recording Replacement
Scenario: NBC Morning Show — Recording 06:00–10:00 (Chicago / GMT-6)
Recording ends
Job runs, replaces in ~1s
New content on air
Multiple Occurrences in One Day
If the same placeholder appears at 08:00 and 20:00, you need two separate jobs:
Runs at 07:55
→ replaces 08:00 entry
Runs at 19:55
→ replaces 20:00 entry
Each job replaces only the next matching entry after its run time. Schedule each job shortly before the placeholder it should replace.
📋 Managing Jobs
Job List
All jobs are displayed in a card list showing the job name, type badge (Replacement or Injection), schedule, last run time, status badge (✓ Success / ⚠ Partial / ✗ Failed), and active/inactive toggle.
Actions
- ✏️ Edit: Modify any job setting
- 📋 Logs: View full execution history with details per entry
- 🗑️ Delete: Remove the job and its EventBridge rule permanently
Execution Logs
Each log entry shows: execution timestamp, which asset was selected (PRIMARY or BACKUP), how many schedule entries were processed, and individual success/failure per entry. The logs always indicate which asset was used so you can monitor when fallbacks occur.
Best Practices
- Consistent naming: Standardize asset names in Uplynk CMS for reliable matching
- Always configure backup: For critical content, set a backup target to avoid failures
- Use "Daily at specific time": For recurring content, this is cleaner than "Every X minutes"
- Enable 24h filter for daily content: Prevents accidentally using stale assets
- Monitor logs weekly: Check for recurring failures or unexpected backup usage
- Buffer time: Schedule jobs with at least 2 minutes before the content needs to be on air
- Use "Delete if targets fail": Only when airing the placeholder is worse than having no entry (e.g., channel will fall back to live slicer)
- For injections: Use exact, stable asset names and keep Time to Run at least 5 minutes before Injection Time
🔧 Troubleshooting
Job Not Executing
- Check if job status is "Active"
- Verify timezone is correct — "Last run" is shown in the job's timezone
- EventBridge has up to 60s natural delay
Asset Not Found
- Asset name must match exactly (case-sensitive)
- If 24h filter is on, ensure the asset was created within the last 24 hours
- Configure a backup target as a safety net
Replacement Failed
- Open the execution logs for the specific error message
- Verify the schedule entry still exists (wasn't manually deleted)
- Ensure the target asset has actual media, not just metadata
Slicer Recording
Guide to managing Slicer recording schedules
About Slicer Recording
The Slicer Recording tool allows you to manage automated recording schedules for Uplynk Slicer devices. You can configure when and what to record, and the system will automatically handle the recording process.
Key features:
- Manage multiple Slicer configurations
- Create weekly recording schedules
- Configure recording times using SMPTE timecode
- Support for different timezones
- Visual weekly grid view with live time indicator
- Automatic schedule synchronization with Slicer devices
Slicer Configuration
Before creating schedules, you need to add your Slicer configurations. Click "➕ Add Slicer" to create a new configuration.
Required Fields:
- Slicer Name: A friendly name to identify this Slicer (e.g., "NBC Chicago Slicer")
- Slicer ID: The unique identifier for your Slicer device in Uplynk
- User ID (Owner): Your Uplynk user/owner ID
- API Secret: Your API secret key for authentication
- Timezone: The timezone for the Slicer location (e.g., America/Chicago for GMT-6)
Daily Restart
If a slicer needs an automatic restart, enable "Restart slicer every day at" and choose the local time for that slicer.
- The restart setting belongs only to the selected slicer
- Leaving the checkbox off means that slicer will not be restarted by this option
- Other slicers in the same account keep their own independent restart settings
After saving, your Slicer configuration will appear in the list. Click "📅 View Schedule" to manage the recording schedule for that Slicer.
Managing Recording Schedules
Weekly Grid View
The schedule is displayed in a weekly grid format, showing all 7 days side-by-side. Each day shows:
- Day name and date at the top of each column
- Recording entries with start and end times
- Live time indicator - a red line showing the current time in the configured timezone
Navigation Controls
- ← Previous Week / Next Week →: Navigate between weeks
- 🔄 Refresh: Reload the schedule from the Slicer device
- ➕ Add Entry: Create a new recording entry
- 🔄 Replicate: Replicate a period of the schedule across multiple days
- 💾 Save Schedule: Save changes to the Slicer device
Adding Recording Entries
Click "➕ Add Entry" to create a new recording. You'll need to specify:
- Date: When to record (optional if using "Add to all existing days")
- Timecode: Start time in SMPTE format (HH:MM:SS;FF)
- Title: Description of the recording (e.g., "Morning News")
- Break Type: Type of content (e.g., "content", "ad_break")
Add to All Existing Days
When adding an entry, you can check "Add to all existing days in schedule" to create the same recording entry for every day that already has entries in the schedule. This is useful for recurring daily recordings.
Editing Entries
Right-click on any entry in the grid to edit it. You can modify:
- Date and time
- Title/description
- Break type
The timezone label shows the current GMT offset (e.g., "Timecode - GMT -6") to help you understand the time conversion.
Replicating Schedule Periods
The "🔄 Replicate" button allows you to copy a time period of your schedule and replicate it across multiple days. This is extremely useful for creating weekly schedules or extending existing patterns.
How to use:
- Click "🔄 Replicate" button
- Set the Period Start date and time (when the period to copy begins)
- Set the Period End date and time (when the period to copy ends)
- Enter the Number of Days to Replicate (how many days forward to copy)
- Optionally check "Overwrite existing entries" if you want to replace entries that already exist at the same times
- Click "🔄 Replicate Schedule"
- Start: Jan 22, 00:00:00
- End: Jan 22, 23:59:59
- Days: 6
Overwrite Option:
By default, the replication will skip entries that already exist at the target date/time. If you check "Overwrite existing entries", any existing entries at the same date/time will be replaced with the replicated ones. This is useful when you want to update an existing schedule pattern.
Copy/Paste to Clipboard
You can copy entire schedules or date ranges to your clipboard and paste them into other Slicer configurations.
Copy to Clipboard:
- Click "📋 Copy to Clipboard" button
- Choose to copy all schedule days or select a date range
- Click "📋 Copy to Clipboard" to copy the entries in JSON format
- The schedule data is now in your clipboard
Paste from Clipboard:
- Load a different Slicer configuration (or stay in the same one)
- Click "📥 Paste from Clipboard" button
- Review the confirmation showing how many entries will be pasted
- Click OK to add the entries to the current schedule
Split Recording
The Split Recording feature allows you to divide a recording into two parts at the midpoint of its duration. This is particularly useful when you need to air a program while it's still being recorded.
How to split:
- Right-click on an entry to open the edit modal
- Click the "✂️ Split Recording" button
- Review the confirmation showing how the recording will be split
- The entry will be divided into "Part 1" and "Part 2" with adjusted times
- Part 1: 06:00:00;00 to 08:00:00;00
- Part 2: 08:00:00;01 to 10:00:00;00
Real-World Use Case: Live-to-Tape Workflow
The Split Recording feature is essential for same-day broadcast scenarios where you need to air a program immediately after (or even during) its recording. This is common for:
- Morning news shows that need to air in different time zones
- Live events that must be broadcast with minimal delay
- Programs recorded in one market and aired in another
Workflow Example: Morning News Show
Let's say you're recording a 4-hour morning show (06:00-10:00 Chicago time) and need to air it immediately in another market:
- Recording: 06:00-10:00 (Chicago time)
- Goal: Start airing Part 1 at 08:00 while Part 2 is still recording
- Challenge: Can't air the entire recording until 10:00 when it finishes
Solution using Split Recording:
- Split the recording:
- Original: 06:00-10:00 (4 hours)
- After split: Part 1 (06:00-08:00) + Part 2 (08:00-10:00)
- Schedule Part 1 for immediate broadcast:
- Add Part 1 to your channel schedule to air at 08:00
- Use the Schedule Automation tool to automatically replace a placeholder with Part 1 when it's ready
- Part 1 finishes recording at 08:00 and immediately starts airing
- Continue recording Part 2:
- While Part 1 is airing (08:00-10:00), the Slicer continues recording Part 2
- Part 2 records from 08:00-10:00 (the second half of the show)
- Part 2 can be scheduled to air later or used for other purposes
- 06:00-08:00: Recording Part 1 📹
- 08:00: Part 1 recording completes ✅
- 08:00: Part 1 starts airing on channel 📺
- 08:00-10:00: Recording Part 2 📹 (while Part 1 airs)
- 10:00: Part 1 finishes airing, Part 2 recording completes ✅
Integration with Schedule Automation
To automate the workflow, combine Split Recording with the Schedule Automation tool:
- Create a placeholder asset in your channel schedule at 08:00
- Configure an Auto Replacement job to:
- Target Asset Name: "NBC Morning Show Part 1"
- Execution Time: 08:00:10 (10 seconds after recording completes)
- Frequency: Daily at 08:00:10
- The system will automatically replace the placeholder with Part 1 as soon as it's available
- Part 1 airs seamlessly while Part 2 continues recording
- Timing: Ensure Part 1 has enough time to finish processing before it needs to air
- Buffer: Add a small buffer (10-30 seconds) between recording completion and air time
- Asset Naming: Use consistent naming conventions (e.g., "Show Name Part 1", "Show Name Part 2") for reliable auto-replacement
- Monitoring: Monitor the first few executions to ensure timing is correct
Benefits of This Workflow:
- Minimal Delay: Content airs almost immediately after recording
- Continuous Recording: No interruption to the recording process
- Flexibility: Part 2 can be used for different time zones, repeats, or archives
- Automation: Once configured, the process runs automatically every day
- Quality: Full-quality recording without compression or streaming artifacts
Auto Replicate
The Auto Replicate feature automatically copies the last day's schedule to the next day when it's empty. This ensures your recording schedule continues without manual intervention.
How it works:
- Runs automatically every day at 18:00 UTC (15:00 BRT / 13:00 EST / 10:00 PST)
- Checks if the next day has any scheduled entries
- If empty, copies all entries from the last day with entries to the next day
- If the next day already has entries, it skips (no overwrite)
Enabling Auto Replicate:
- Open the schedule for your Slicer
- Check the "Auto replicate last day, if next day is empty" checkbox at the bottom
- The status will show when the last replication ran and the result
Reset Recordings
The Reset Recordings button allows you to reset all recording entries to a default "live stream" state. This is useful when the Slicer is recording with incorrect names, old configurations, or at different times than expected.
When to use Reset:
- The Slicer is recording with old or incorrect asset names
- Recording times don't match what's shown in the schedule
- You need to clear the schedule and start fresh
- The Slicer seems to be using a cached or outdated configuration
Reset Procedure:
- Backup your schedule:
- Click "📋 Copy to Clipboard" to save your current configuration
- This copies all entries to your clipboard as a backup
- Apply the reset:
- Click "🔄 Reset Recordings"
- Confirm the action when prompted
- This replaces all entries with a single "live stream" entry at 23:00:00 for each day
- Save the reset schedule:
- Click "💾 Save Schedule" to upload the reset configuration
- Wait for the Slicer to update:
- Wait 2 minutes for the Slicer to receive and apply the new configuration
- Restore your schedule:
- Click "📥 Paste from Clipboard" to restore your original configuration
- Click "💾 Save Schedule" to upload
- Wait again:
- Wait another 2 minutes for the Slicer to apply the restored configuration
- Restart the Slicer:
- Restart the Slicer device to ensure it picks up the new configuration
Timezone Handling
The Slicer Recording tool handles timezones automatically:
- Display: All times are shown in the configured timezone (e.g., America/Chicago)
- Storage: Times are stored in the Slicer's local timezone
- Live Indicator: The red line shows current time in the configured timezone
- Global Clock: The header shows "Local time GMT ±X" with the current time
Saving Changes
After making changes to the schedule, click "💾 Save Schedule" to upload the updated schedule to the Slicer device.
What happens when saving:
- The schedule is validated for correct format
- Times are converted to the Slicer's timezone
- The schedule is uploaded to Uplynk via API
- The Slicer device receives the updated schedule
- The saved schedule becomes the new reference version used for future restore checks
- A success message confirms the save
Tips & Best Practices
- Use descriptive titles: Make it easy to identify recordings at a glance (e.g., "NBC Morning 06:00-10:00")
- Plan your schedule: Create entries for the entire week to ensure continuous coverage
- Use Replicate for weekly patterns: Create one perfect day, then replicate it across the week to save time
- Check the live indicator: The red line helps you see what's currently recording
- Refresh regularly: Click refresh to ensure you're viewing the latest schedule from the Slicer
- Use "Add to all days": For daily recurring recordings, this saves time
- Right-click to edit: Quick access to edit any entry in the grid
🧩 Schedule Creator
Build channel schedules from your content libraries using structured rules
About Schedule Creator
The Schedule Creator allows you to generate complete channel schedules by defining content blocks — time periods filled with assets from your Uplynk content libraries. Instead of manually adding entries one by one, you define rules and the tool builds the schedule automatically.
Key features:
- Define multiple content blocks with different asset libraries
- Set date ranges up to 7 days
- Randomize asset order between days
- Use fixed-duration blocks without cutting videos
- Control the maximum daily gap left near midnight
- Control max repeats per asset per day
- Set minimum distance between same asset repeats
- Save and load presets for quick reuse
- Preview generated schedule before saving to Uplynk
★ Schedule Presets
Save your schedule configurations as presets for quick reuse. This is especially useful when you have recurring schedule patterns.
- Save Preset: Enter a name and click "Save Preset" to store all current settings (blocks, parameters, date range)
- Load Preset: Select a saved preset from the dropdown and click "Load" to restore all settings
- Delete Preset: Remove a preset you no longer need
Schedule Parameters
1. Date Range
Select the Start Date and End Date for the schedule. Maximum range is 7 days. Each day starts at 00:00 and ends at 23:59:59 in your configured timezone.
2. Content Blocks
Content blocks define time periods in each day and which asset library to use for filling that time. Click "+ Add Content Block" to create blocks.
Each content block has:
- Start Time / End Time: The time window for this block (e.g., 06:00 to 12:00)
- Library: Select which content library to pull assets from
The tool fills each block with full assets from the selected library, fitting them end-to-end within the time window.
3. Use Duration
When a block has a fixed duration, the tool tries to build the best combination of full videos for that duration. Videos are not shortened to force a perfect fit.
- If an exact combination is available, the block fills exactly
- If an exact combination is not available, the block stops slightly short instead of cutting the last video
- Small remaining gaps are kept as close to midnight as possible
4. Max Daily Gap
Use Max Daily Gap to choose the largest acceptable empty time at the end of a generated day. The default is 30 seconds.
Small gaps are expected when full videos cannot make an exact 24-hour total. Configure a default Uplynk Missing Content Slate for each channel so Uplynk can fill these short gaps near midnight.
5. Randomize Asset Order
When enabled, each day will have a different asset sequence from the library. This prevents the same order of content repeating every day.
6. Max Repeats per Asset per Day
Limits how many times the same asset can appear in a single day. Set to 0 for unlimited. If all assets reach the limit, remaining time will be left empty.
7. Min Distance to Repeat Same Asset
Minimum number of different assets that must play before the same asset can repeat. This prevents the same video from ending one block and starting the next. Set to Off to disable.
⚡ Generating the Schedule
Click "⚡ Generate Schedule" to build the schedule based on your parameters. The tool will:
- Process each content block for each day in the date range
- Fill time windows with assets from the selected libraries
- Apply randomization and repeat constraints
- Display a preview in a weekly grid view
Schedule Preview
After generation, you'll see a weekly grid preview showing all entries. Review the schedule to ensure it looks correct before saving.
Saving to Uplynk
Click "💾 Save Schedule to Uplynk" to upload the generated schedule. A progress bar shows the upload status as entries are sent to the Uplynk API.
Tips & Best Practices
- Start small: Generate 1-2 days first to verify the output before doing a full week
- Use presets: Save working configurations to avoid re-entering settings
- Check the summary: The block summary shows total time and gaps. Only review gap warnings when the day exceeds your Max Daily Gap setting
- Vary content: Use the randomize option and min distance to keep the schedule fresh
- Use channel slates: Configure a default Missing Content Slate in Uplynk for each channel that uses generated schedules
- Review before saving: Always check the preview grid before uploading to Uplynk
Automation Console
Build trigger-driven automations for live streams, SCTE-35 signals, schedules, recordings, and channel actions
About Automation Console
Automation Console turns live video and metadata signals into automated actions. Instead of depending only on fixed clock times, you can detect what is happening on the channel and trigger the right operation at the right moment.
Use it for workflows such as starting a recording when a program opening is detected by visual reference only, stopping when the ending scene appears, replacing incoming SCTE-35 markers, inserting replay assets, or cutting to a live feed from another Slicer.
Core Concepts
Triggers
A trigger is the condition that starts an automation. Triggers do not have to perform an action by themselves; they can simply notify one or more actions to run.
Actions
An action is what Automation Console performs after a trigger fires. One trigger can command multiple actions, and an action can also become the trigger for another action to create a sequence.
Sessions
Standalone sessions use a Session ID and Session password. When launched from Lynk Tools, the account context and Uplynk credentials are provided automatically, so users do not need to re-enter Workspace ID or Integration API Key.
SRT and Output Modes
Input Only
Use Input Only when the console only needs to observe the incoming signal and run actions that do not modify the outgoing stream, such as Slicer recording, schedule asset injection, or live feed scheduling.
Process and Forward SRT
Use Process and Forward SRT when you need SCTE-35 insertion or original SCTE-35 PID removal. This mode requires an SRT output destination or listener endpoint because the stream is processed and forwarded.
Available Triggers
Scene Detection
Upload or reference a short MP4 clip, up to 10 seconds, that represents the scene to detect. Automation Console extracts reference frames and compares them against the live input during the configured active days and time window.
- Use clear, unique scenes that are unlikely to appear elsewhere in the program.
- The UI shows extracted reference frames so you can verify what the detector is looking for.
- The live status shows the best score per job during the active window, which helps tune the confidence threshold.
- Changing the reference MP4, adding a new scene trigger, or recreating jobs requires Stop and Start to rebuild templates.
Input SCTE-35 Trigger
Listen for SCTE-35 markers arriving in the input transport stream. Configure the PID, command type, and segmentation type to decide which markers should trigger actions.
- Use this when an upstream system already marks program or ad boundaries.
- Optionally remove the original SCTE-35 PID from the output when the output mode processes and forwards SRT.
- This trigger is designed to fire quickly because downstream actions often need to happen close to the incoming marker time.
Day/Time Trigger
Run an automation at a specific local time using the selected timezone and active days. This is useful for predictable daily events or fallback workflows that should run even without video or SCTE-35 detection.
After Trigger or After Action
Run one job after another trigger or action completes. Use the delay field to build sequences, such as starting a recording on the opening scene and then inserting a schedule item a few seconds later.
Trigger Conditions
Actions can use one trigger directly, or combine two triggers for more advanced logic.
OR Condition
The action runs when either trigger fires first. Use the cooldown window to prevent the second trigger from firing the same action again within the same event window.
AND Condition
The action runs only when both triggers happen inside the configured time window. Use this when a single signal is not reliable enough on its own.
Available Actions
SCTE-35 Injection
Insert new SCTE-35 markers in the SRT output. Configure the PID, command type, segmentation type, duration, UPID, and related SCTE-35 fields. Use this to normalize or replace upstream markers before the signal reaches the encoder or downstream system.
Uplynk Slicer Recording
Control a Live Slicer recording from automation. Start recording sends a Live Slicer content_start command using the configured file name. Stop recording sends a blackout command to end the recording segment and return to the default live capture state.
- Start recording: provide the recording file name.
- Stop recording: no file name is required; the slicer returns to the default live capture behavior.
- Stop by starting a new recording: if you do not want the Slicer to remain in blackout with no video output, trigger another Start recording action with the next desired file name instead of using Stop recording.
- Use action delay only when you intentionally want the command to happen after the trigger.
Schedule Asset Injection
Insert one or more VOD assets into a channel schedule. Automation Console can search assets by name, use the newest matching asset when names repeat, and schedule the insertion immediately, today, tomorrow, or on a fixed date using the selected timezone.
- Use Immediately for actions that should schedule assets as soon as the trigger fires.
- Use Today, Tomorrow, or Fixed date when you need a specific local air time.
- Tomorrow can skip weekends so a Friday trigger schedules the item for Monday.
- If an asset is not ready yet, the system retries briefly before reporting an error.
Live Feed
Insert or remove a live feed from another Slicer in the channel schedule. Use Insert Slicer with a duration in HH:MM:SS, or Remove Slicer to cut the live feed from the schedule.
Testing and Monitoring
- Test Action: simulates a trigger and runs the selected action so you can validate API credentials and action behavior quickly.
- Reference frames: show what the scene detector extracted from the MP4 reference.
- Best score: shows how close the live video is to each scene reference during the active window.
- Last run: shows the most recent trigger or action execution in UTC.
- Input signal status: indicates whether the processor is stopped, initializing, waiting for SRT input, or receiving the stream.
Example Workflows
Record a show without relying on exact clock time
- Create a Scene Detection trigger for the program opening.
- Create a Scene Detection trigger for the program ending.
- Create a Start Recording action after the opening trigger.
- Create a Stop Recording action after the ending trigger.
This workflow is resilient to live program delays because recording follows what actually appears in the feed.
Replace an upstream SCTE-35 marker
- Create an Input SCTE-35 trigger for the original PID and segmentation type.
- Enable original PID removal if the original marker should not pass through.
- Create an SCTE-35 Injection action with the new PID and segmentation type.
Schedule a replay when a live segment ends
- Create a trigger for the ending scene or ending SCTE-35 marker.
- Create a Schedule Asset Injection action.
- Use Immediately, Today, or Tomorrow depending on when the replay should air.
Use two possible signals for the same automation
Configure the action with an OR condition using the primary trigger and a backup trigger. Set a cooldown window so only the first signal runs the action.
Best Practices
- Use short, distinctive MP4 references, ideally under 10 seconds.
- Keep scene detection windows as narrow as practical to reduce unnecessary processing.
- Use Test Action before waiting for a live event.
- Set action delay to 0 when the fastest possible response is required.
- Restart the processor after changing scene reference MP4s or adding scene triggers.
- Use Input Only unless you need SCTE-35 injection or SRT output PID handling.
Player Geo Redirect
Create origin URLs and route player traffic by country or region
About Player Geo Redirect
Player Geo Redirect creates a unique origin URL and redirects player traffic based on geographic rules. Use it when different countries or regions need different stream URLs.
- Rules are evaluated by priority, lowest number first
- The first matching rule wins
- The default URL is used when no rule matches
Configuration Flow
Name and default URL
Use it as the player URL
Country, region, priority, destination
Rules and Fallback
- Default fallback URL: Used when no rule matches
- Priority: Lower number means higher priority
- Country: Country that activates the rule
- States / Regions: Leave all unchecked to match the entire country
- Destination URL: Final URL where the player is redirected